- Download the installer from the Microsoft website (currently: http://windows.microsoft.com/en-US/windows/security-essentials-download)
- Save the resulting file as "c:\mseinstall.exe"
- Win + R, "cmd", enter, type in "c:\mseinstall.exe mssefullinstall-amd64fre-en-us-vista-win7.exe /U"
- To reinstall, just start mseinstall.exe
Uninstall Microsoft Security Essentials
Microsoft Security Essentials can be uninstalled from Windows 7 as follows:
Flash 11.4 in SRWare IronPortable v22
To get Flash support in the portable version of Iron v22:
- Start IronPortable and type "about:plugins" in the URL bar
- Scroll to the section titled "Flash"
- If there is one enabled item within that section, then Flash should already work. Test it here: http://www.adobe.com/software/flash/about/
- If the section does not exist or there are no items in it, then
- Create a folder called "iron\plugins" in the IronPortable folder
- Download the file NPSWF32_11_4_402_278.dll from the internet or copy it from the system Flash installation folder and put it in the previously created folder.
Example system Flash installation folder: C:\Windows\SysWOW64\Macromed\Flash\NPSWF32_11_4_402_287.dll - If there are more items, then
- Disable all items but one for Flash v11.4
- Restart iron and type "about:plugins"
- If all Flash items are disabled, then enable one Flash item
Note: putting file gcswf32.dll in the root of the IronPortable folder does no longer work!
Stop Outlook from reformatting telephone numbers
A telephone number gets reformatted when adding it to a contact in Outlook, e.g. "+31.." becomes "31".
This behaviour can be stopped as follows:
This behaviour can be stopped as follows:
- Start, Search: "phone" and hit enter. If this doesn't work, then start the Telephony service:
- Start, Search: "services" and hit enter - Double click Telephony (TapiSvr)
- Startup type: automatic
- Click Start
- In the Phone and Modem screen, select a location or, if required, make a new location and use anything for the area code
- Click Edit..
- Country/region: Internation Freephone Service
- (Stop and) start Outlook
Note: it doesn't stop reformatting completely.
E.g. "+31-12345678" still gets reformatted to "+31 12345678", but at least the starting "+" sign remains untouched. And "+31612345678" gets reformatted to "+31612345678 "
E.g. "+31-12345678" still gets reformatted to "+31 12345678", but at least the starting "+" sign remains untouched. And "+31612345678" gets reformatted to "+31612345678 "
Epson AL-C900 with empty color toner

This can be fixed as follows:
- Connect the printer directly, i.e. via USB to the PC or laptop and turn the printer on
- Install "Status Monitor 3 1.1b" from the Epson website:
http://esupport.epson-europe.com/FileDetails.aspx?lng=en-GB&id=31761
The name of the downloaded file is: epson31761eu.exe
Note: there is no separate Windows 7 x64 version, so use the Windows Vista x64 version for that platform - Right-click the "Status monitor 3" icon in the tray and:
- Epson AL-C900 -> Printer Setting...
- Check "Continue printing when consumables are empy"
MS Access DSN-less connection
It is possible to create a DSN less linked table and/or pass-through query from Microsoft Access to SQL Server Express without deleting those objects first, as is often suggested, e.g. here:
http://www.accessmvp.com/djsteele/DSNLessLinks.html
This is safer, because the linked objects will be gone if the code fails after deleting the objects, but before re-adding has completed.
One of the downsides of this approach is that MS Access has to be re-started for the new connections to be effected. In more detail: Access caches ODBC connections. For example, when a working ODBC connection of a linked table is replaced with one that has a wrong username, it will still work, because the previous one is retrieved from cache. It is not possible to clear this cache programmatically or manually, unless Access is restarted. Furthermore, Access only adds new connections to the cache when the driver, server or database property changes. Adding a new and correct ODBC connection to a linked table that only as a different login than the old one has no effect! The old connection from the cache will be used.
Another downside is that the database grows significantly after each execution of the code. A compact/repair resolves this. Set the "compact on close" property on the database.
Use this code to loop over all tables and queries to set the connection string:
Dim db As Database
Dim td As TableDef
Dim qd As QueryDef
Dim strODBC As String
Set db = DBEngine(0)(0)
strODBC = "ODBC;DRIVER=SQL Server;SERVER=REMOTESERVER\SQLEXPRESS;DATABASE=TestDB;UID=sa;PWD=sa;Trusted_Connection=No;"
' reconnect pass-through queries
For Each qd In db.QueryDefs
With qd
If Left$(.Connect, 4) = "ODBC" Then
' note: for a passthrough query the uid and pwd are always stored
.Connect = strODBC
.Close
End If
End With
Next qd
' reconnect linked tables
For Each td In db.TableDefs
With td
If Left$(.Connect, 4) = "ODBC" Then
' note: for a linked table the uid and pwd are only stored when this property is set!
.Attributes = dbAttachSavePWD
.Connect = strODBC
.RefreshLink
End If
End With
Next td
db.Close
Set db = Nothing
Notes:
- Use DBEngine(0)(0) in stead of CurrentDB(); the implementation is 1000x faster
- Use Left$ in stead of Left; the implementation is faster
- This particular code assumes that DAO is used, not ADO
- The connection uses a SQL Server Authentication instead of Windows Authentication
- The connection string value is assigned to variable strODBC
- The connection string has to start with the text "ODBC;" both for the linked table as the pass-through query
- If the connection is to a default instance of SQL Server, the string "\SQLEXPRESS" can be removed
- By default, the username and password are stored for a pass-through query, but not for the linked table. This appears to be a bug, it either should be set for both or for neither. Setting the uid/pwd parameters for a linked table does, however, not result in an error
- ... but if the code td.Attributes = dbAttachSavePWD is used, then the uid/pwd are also stored for a linked table. At least for MS Access 2010 on Windows 7 x64, this is enough. In some cases two registry settings need to be set for this to work:
REGEDIT4
[HKEY_LOCAL_MACHINE\SOFTWARE\Microsoft\Windows\CurrentVersion\Policies\Network]
"DisablePwdCaching"=dword:00000000
[HKEY_LOCAL_MACHINE\SOFTWARE\Microsoft\Office\8.0\Common\Security]
"DisablePwdCaching"=dword:00000000 - After the code has run, the connection string has been set for all the objects, but is not yet effective! For this, MS Access needs to be closed and reopened
- I found that the reconnecting loop using DRIVER=SQL Server in stead of
DRIVER={SQL Server}or
PROVIDER={SQL Server Native Client 10.0 ODBC Driver}
was much faster - Close and destroy the reference to the database object to prevent memory leaks
Related errors might include:
"login failed. The login is from untrusted domain and cannot be used with windows authentication"
PALO backend is unavailable
You might get an "backend is unavailable" error when connecting to the PALO server from an internet page.
Check the %SYSTEMDRIVE%\Program Files (x86)\Jedox\Palo Suite\log\core.log file for a probable cause. In my case the fonts folder did not exist:
[2012/05/02 10:22:28] ERROR [core] palo web core server version boost::filesystem::basic_directory_iterator constructor: The system cannot find the path specified: "C:\WINDOWS\Fonts"
The reason for this error is that Windows and the program files folder are installed on my G drive and PALO apparently hardcodedly searches the C drive for these fonts. The service PaloWebCoreServerService cannot start because of this error.
Resolution:
- Create a folder called c:\windows\fonts
- Copy at least the following fonts from the g:\windows\fonts folder:
andalemo.ttf
arial.ttf
arialbd.ttf
comic.ttf
courier.ttf
georgie.ttf
impact.ttf
times.ttf
trebuc.ttf
verdana.ttf
webdings.ttf
If any of these fonts is not available in the folder, then download them from Microsoft:
http://sourceforge.net/projects/corefonts/files/the%20fonts/final/
- Start the service PaloWebCoreServerService
Bamboo Pen & Touch supported driver not found
If you try to start the Wacom Bamboo Preferences application, but get an error message displaying "a supported tablet could not be found", then check if the service "Wacom Consumer Touch Service" is enabled and running.
Oracle OLE DB source in SSIS
 An OLE DB source to Oracle can be added to a SSIS package.
Example data
Server: locksnlatches.mydomain.com
Oracle instance/SID: dwh
Username/schema: scott
Password: tiger
An OLE DB source to Oracle can be added as follows:
- From the menubar, select SSIS -> New connection... -> OLEDB -> Add -> New
Provider: Oracle Provider for OLE DB
Server or filename: locksnlatches/dwh
User name: scott
Password: tiger
Notes:
- The "Oracle Provider for OLE DB" provider always exists in SSIS. It is a wrapper around the Oracle Client driver that is installed when installing Integration Services. However, the Oracle Client has to be installed separately. It can be downloaded from the Oracle website: instantclient-basiclite-nt-11.2.0.2.0. Install the 32 bit version of the driver to be able to use it in the design environment. The Visual Studio / SSIS IDE does not support 64 bit components
- It is possible to use the 64 bit Oracle Client driver during execution of the package, e.g. via dtexec, but it needs to be installed additionally. The SSIS package has to be configured to use this different version during runtime.
- If the server cannot be found, then use the fully qualified name. One reason might be that the Oracle server is located in a different (Windows) domain as the SSIS server.
Reference SQL Server table with spaces from Oracle
It is possible to select data from a SQL Server table that contains spaces by using a database link from Oracle.
The syntax is as follows:
SELECT * FROM "DBO$TABLE WITH SPACES"@MYDBLINK
with
SQL Server login/user: dbo
SQL Server table name: table with spaces
DB link: mydblink
The syntax is as follows:
SELECT * FROM "DBO$TABLE WITH SPACES"@MYDBLINK
with
SQL Server login/user: dbo
SQL Server table name: table with spaces
DB link: mydblink
Query Oracle from SQL Server

- Install the Oracle Instant Client (OIC) on the machine where SQL Server is running and add the "Oracle Provider for OLE DB" driver, e.g. to folder c:\oracle11g.
- For a SQL Server x64 version running on a Windows x64 OS download the instantclient-basiclite-windows.x64-11.2.0.2.0.zip. This is a 22 MB download.
- Then add the Oracle Data Access components, to get the "OLE DB for Oracle" driver:
http://www.oracle.com/technetwork/database/windows/downloads/index-090165.html
At the time of writing (March 2012): select the "64-bit ODAC 11.2 Release 4 (11.2.0.3.0) Xcopy for Windows x64". This is a 54 MB download - Inside SQL Server Management Studio:
Linked Servers -> Providers -> OraOLEDB.Oracle -> Allow inprocess = true - Optional: to enable adhoc querying (querying without a linked server), then enable this:
- SQL Server 2005 via surface area configuration tool
- SQL Server 2008 via facets: inside SQL Server Management Studio, right click the server -> facets -> facet: surface area configuration -> AdHocRemoteQueries = true
- Optional: if the connection to Oracle should be based on a TNS names entry, then add an "admin" folder to the OIC folder. Put or create an tnsnames.ora file there, e.g. c:\oracle11g\admin\tnsnames.ora
- Optional: use "tnsping" to test the entry from the command prompt, e.g. "tnsping dwh.world". If it doesn't recognize the entry, then create an environment variable called "TNS_ADMIN" and let it point to this "admin" folder, e.g. c:\oracle11g\admin
- Optional: if the following steps to get data from an Oracle instance don't work, then edit this registry key: HKEY_LOCAL_MACHINE\SOFTWARE\Microsoft\MSDTC\MTxOCI.
Set the following values:
OracleXaLib=oraclient11.dll
OracleSqlLib=orasql11.dll
OracleOciLib=oci.dll
Note: these DDLs can be found in the c:\oracle11g\product\11.2.0\client_1\BIN
folder. The specific version depends on the Oracle Client and might be for example oraclient10.dll en orasql10.dll. Use the names of the DDLs as found in this folder.
Three ways to get the data from an Oracle instance
 Example:
Server: locksnlatches
Oracle instance (SID): dwh
Port: 1521
Schema/user: scott
Password: tiger
tnsnames.ora entry:
dwh.world =
(DESCRIPTION=
(CID=DWH_APP)
(ADDRESS_LIST=
(ADDRESS=
(PROTOCOL=TCP)(HOST=locksnlatches)(PORT=1521)
)
)
(CONNECT_DATA=
(SID=dwh)
)
)
 Example:
Server: locksnlatches
Oracle instance (SID): dwh
Port: 1521
Schema/user: scott
Password: tiger
tnsnames.ora entry:
dwh.world =
(DESCRIPTION=
(CID=DWH_APP)
(ADDRESS_LIST=
(ADDRESS=
(PROTOCOL=TCP)(HOST=locksnlatches)(PORT=1521)
)
)
(CONNECT_DATA=
(SID=dwh)
)
)
1) Using a linked server
- Linked Servers -> New linked server... -> General ->
- linked server: lnk_locksnlatches (this name can be anything)
- provider: Oracle provider for OLE DB
- product name: oracle (this name can be anything)
- data source: (DESCRIPTION=(CID=DWH_APP)(ADDRESS_LIST=(ADDRESS=(PROTOCOL=TCP)(HOST=locksnlatches)(PORT=1521)))(CONNECT_DATA=(SID=dwh)))
- provider string: leave empty!
- location: leave empty!
- catalog: leave empty!
- Linked Servers -> New linked server... -> Security ->
- Be made using this security context
- Remote login: scott
- With password: tiger
Use the four-point notation to retrieve data from Oracle:
SELECT 1 FROM lnk_locksnlatches..scott.dual
Note: the "security" tab specifies the Oracle schema/user and password used by the connection!
2) Without a linked
server (TNS-less)
SELECT * FROM OPENROWSET('OraOLEDB.Oracle',
'(DESCRIPTION=(CID=DWH_APP)(ADDRESS_LIST= (ADDRESS=(PROTOCOL=TCP)(HOST=locksnlatches)(PORT=1521)))(CONNECT_DATA=(SID=dwh)))';'scott';'tiger','SELECT 1 FROM DUAL') x
3) Without a linked
server (TNS-full)
SELECT * FROM OPENROWSET('OraOLEDB.Oracle',
'dwh.world';'scott';'tiger','SELECT 1 FROM DUAL') x
Power view on analysis services tabular
How to create a Power View report using Sharepoint 2010 and Analysis Services 2012 Tabular as the data source?0) Prerequisites
A server called "bisql01" with the following services installed:
- sql server 2012 (mssqlserver = default instance)
- analysis services 2012 (mssqlserver = default instance)
- analysis services 2012 tabular mode / vertipaq (astabular = named instance)
- reporting services (mssqlserver = default instance)
- sharepoint 2010 installed at https://powerview.locksnlatches.com
INSIDE VISUAL STUDIO 2012
1) create project
new project -> analysis services tabular project
name: cp_windows7
2) set deploy target of model
rightclick project "cp_windows7" -> properties ->
server: localhost\astabular
database: cpdm
impersonation settings: default
note: there is probably also a default instance of analysis services running; this is the regular multidimensional cube instance like the previous versions of sql server, not the named tabular model instance
note: the cpdm tabular database will be created on deploy
note: there will also be a work tabular database for the current project named after the project, first data source and a guid, e.g. CPDV_BI01_SQL_01e0810e-c8ab-46fd-afe6-098348336a9a. Do not delete this database from the analysis server server!
3) add tables to model
model -> import from datasource -> microsoft sql server:
server name: bisql01 (or "localhost")
log on to the server: use windows authentication
database: cpdv
use service account,
select tables/views,
finish
edit the bism model: model -> model view -> diagram view. If there are no relationships in the source, then they can be added here by dragging and dropping fields from a child to a parent table or vice versa.
change connection type: model -> existing connections -> edit
use sql server authentication
name: sa
password: ***
note: use model -> existing connections, to add tables later on from the same connection
4) set date dimension
view the data: model -> model view -> data view
click the date column, table -> date -> mark as date table
note: mark as date table does not work in the diagram view, only in the data view
note: make sure the date column is unique and continuous
note: a fact table can join to the date dimension on this date field, but also on a unique number field. A date field also needs to be selected in the latter case for "mark as date table" to work.
5) set authorization
models -> roles -> new
name: reader
permissions: read
models -> roles -> members -> add
cloud\bi01_sql
cloud\bi01_admin (=sharepoint account from which powerview is started)
note: if members are added to this role from management studio to the tabular model instance database then they will be overwritten at the next deploy of the project! So, specify the members in the project.
6) build -> deploy
INSIDE SHAREPOINT 2010
7) create semantic model connection
documents -> new document -> bi semantic model connection ->
filename: model.bism (this is the name of the document in sharepoint; it can be anything)
servername: bisql01\astabular
database: cpdm
note: to fix error "database cannot be found", double check that the reader role has read permissions and that the windows accounts used by Sharepoint are added to that group
8) create report data source to semantic model connection
documents -> new document -> report data source ->
data source type: microsoft bi semantic model for power vier
connection string: datasource='https://powerview. locksnlatches.com/Shared%20Documents/model.bism'
credentials: stored credentials
username: cloud\bi01_sql
password: ***
availability: enable
9) create powerview report
click dropdown arrow of report data source -> create power view report
note: to fix error "User 'DOMAIN\user' does not have required permissions": start IE in "run as administrator" mode and connect using "localhost" iso. the server name.
note: the reporting services logfiles are located here C:\Program Files\Common Files\Microsoft Shared\Web Server Extensions\14\WebServices\LogFiles
Annoying search engine abroad question
Google Chrome asks you if you would like to use another omnibox search engine when you move from one country to another. When you move across the border a lot, then this becomes quite an annoying message:
"Would you like to search with google.country1 instead of google.country2?"
If you always want to use e.g. google.nl, then make the following change:
"Would you like to search with google.country1 instead of google.country2?"
If you always want to use e.g. google.nl, then make the following change:
- Wrench -> Options -> Basics -> Manage search engines
- Scroll to the bottom and fill in the columns:
- In the first column: GoogleNEW
- In the second: Google
- In the third: http://google.nl/search?{google:RLZ}{google:acceptedSuggestion}{google:originalQueryForSuggestion}{google:searchFieldtrialParameter}{google:instantFieldTrialGroupParameter}sourceid=chrome&ie={inputEncoding}&q=%s
- Hit Enter/Return, else the results will no be saved
- Hover over the third column and click "make default"
Quipu connections
Several ways to create a database connection in the open source data warehouse generator Quipu.
SQL Express
- SQL Server configuration manager ->
- Protocols for SQLExpress -> TCP/IP: enabled
- TCP/IP -> IP Adresses -> IP All -> TCP Dynamic Ports: empty
- TCP/IP -> IP Adresses -> IP All -> TCP Port: 666
- SQL Server management studio -> SQL Express server properties -> Security -> Server Authentication: SQL Server and Windows Authentication mode
- Create a SQL Server authentication login on the database server and assign it to the database that will be used by the connection, e.g. login: quipu, password: quipu
- If the database runs on the same machine as Quipu, use "localhost" as the host name. Otherwise use the remote host name
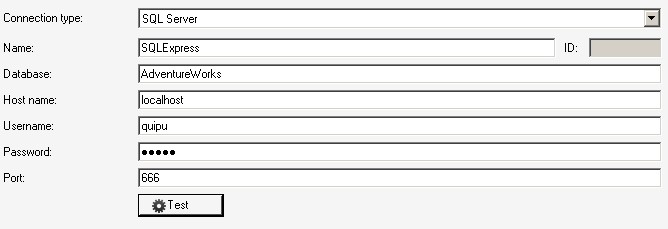
Note:
- Do not use the instance name, e.g. using "AdventureWorks;instance=sqlexpress" as database works, but will, depending on the SQL Server version, result in an "unable to get information" error.
Live calendar displays incorrectly in Chrome
 At last the Windows Live calendar displays appointments correctly again in the latest Google Chrome beta release, 14.0.835.2. They fixed the improper displaying of events.
Up until now you had to use a workaround to have the bars visible in the month view:
- Download the extention Stylish
- Download the style "Hotmail calendar events fix for Chrome browser"
Working with dates in OBIEE
Here are several options to set date formats in OBIEE. Option #1 is the best way to work with dates and comparison of dates to strings containing dates in a particular format.
See also: http://gerardnico.com/wiki/dat/obiee/cast_as_date
The most important settings (with example values) are:
See also: http://gerardnico.com/wiki/dat/obiee/cast_as_date
The most important settings (with example values) are:
- DATE_DISPLAY_FORMAT parameter in nqsconfig.ini: YYYY/MM/DD
- DATESHORTFORMAT parameter in localedefinitions.xml (based on the locale set in nqsconfig.ini): M/D/YYYY
- NLS_DATE_FORMAT parameter of the session (or database default): DD-MON-RR
Method 1 is used for implicit casting only if physical -> Database -> Features: CAST_SUPPORTED is available and enabled. Otherwise the settings described in method 4 (nqsconfig.ini) are used.
1) Tell Oracle how to interpret the casting of a string to date or vice versa (preferred method)
Use the OBIEE function EVALUATE to make use of an Oracle database function. In this case, TO_DATE:
Convert string to date:
EVALUATE('TO_DATE(%1,%2)' AS DATE,'20111231','YYYYMMDD')
Examples of what doesn't work:
EVALUATE('TO_DATE(%1)' AS DATE,'20100101')
--> does not work, unless the string happens to be in the nls parameter format
Convert date to string:
EVALUATE('TO_CHAR(%1,%2)' AS CHAR,DIM_DATE.TODAY,'YYYYMMDD')
EVALUATE('TO_CHAR(%1,''YYYYMMDD'')' AS CHAR,DIM_DATE.TODAY)
Examples of what doesn't work:
Conversions may fail with "date format not recognized" or "datetime value does not match the specified format".
--> does not work, because the result needs to be explicitly cast to a text datatype
EVALUATE('TO_CHAR(%1)',DIM_DATE.TODAY)
--> does not work, unless the date happens to be in the nls parameter format
Set the datatype property in the physical layer on the fields/attributes. Allowed date/time datatypes are:
Test casting of date to string
Example: database or session NLS parameter = 'YYYYMMDD'
CAST(DIM_DATE.TODAY AS CHAR)
CAST('20110211' AS DATE)
CAST('01-FEB-11' AS DATE) --> will fail if nls parameter is set to YYYYMMDD
Notes:
Explicitly set the Oracle NLS property for this to work unambiguously. This property can be set on a database level, affecting all connections made to the database. Alternatively, the property can also be set on the OBI connection in the physical layer of the Admin tool to only affect the current session:
- Double-click "Connection pool" for the Oracle connection
- Select "Connection Scripts" tab
- Add "Execute on Connect" script and type:
ALTER SESSION SET NLS_DATE_FORMAT='YYYYMMDD'
Then, use the following function in Answers formulae:
CAST('20110215' TO DATE)
Note: to check the value of the NLS_DATE_FORMAT parameter at the database level, e.g. from SQL Developer, execute the following statement:
CAST('20110215' TO DATE)
Note: to check the value of the NLS_DATE_FORMAT parameter at the database level, e.g. from SQL Developer, execute the following statement:
SELECT * FROM (
SELECT 'instance' as domain, parameter, value FROM NLS_INSTANCE_PARAMETERS UNION
SELECT 'database' as domain, parameter, value FROM NLS_DATABASE_PARAMETERS UNION
SELECT 'session' as domain, parameter, value FROM NLS_SESSION_PARAMETERS
) x WHERE PARAMETER ='NLS_DATE_FORMAT'
2) Convert a date to string or vice versa using an Oracle database function
Use the OBIEE function EVALUATE to make use of an Oracle database function. In this case, TO_DATE:
Convert string to date:
EVALUATE('TO_DATE(%1,%2)' AS DATE,'20111231','YYYYMMDD')
Examples of what doesn't work:
EVALUATE('TO_DATE(%1)' AS DATE,'20100101')
--> does not work, unless the date happens to be in the nls parameter format
CAST('20110215' TO DATE)
Convert date to string:
EVALUATE('TO_CHAR(%1,%2)' AS CHAR,DIM_DATE.TODAY,'YYYYMMDD')
EVALUATE('TO_CHAR(%1,''YYYYMMDD'')' AS CHAR,DIM_DATE.TODAY)
Examples of what doesn't work:
Conversions may fail with "date format not recognized" or "datetime value
--> does not work, because the result needs to be explicitly cast to a text datatype
EVALUATE('TO_CHAR(%1)',DIM_DATE.TODAY)
--> does not work, unless the date happens to be in the nls parameter format
3) Convert a date to string using different OBIEE functions
An alternative method is to convert the date to a string in stead of converting a testing string to a date. The difference is this:
DATE = ConvertToDate(STRING)
vs
ConvertToString(DATE) = STRING
Convert date to number:
year(FACT_ORDERLINE.DATE) * 10000 + month(FACT_ORDERLINE.DATE) * 100 + dayofmonth(FACT_ORDERLINE.DATE) = 20110231
Note: here the lefthand and righthand side are numbers, not strings, but the idea is the same.
4) Convert a string to date using the OBIEE function "DATE"
In OBIEE, an equivalent of the Oracle function TO_DATE is the DATE function which has a fixed syntax:
YYYY-MM-DD.
For example:
DATE '2011-01-15'
Note:
- This syntax cannot be configured and does not depend on locale or nls settings
- The function cannot be found in the list of functions when adding a formula in Answers.
- It does not use ( or ) signs, but only single-quotes
Set the datatype property in the physical layer on the fields/attributes. Allowed date/time datatypes are:
- DATE
- TIMESTAMP
6*) Locale definitions in configuration files
- [bipath]\web\config\localedefinitions.xml
-- displays possible formats to choose from
-- locale "us-en" is based on locale: us
-- locale "us" contains all possible attributes to choose from, so is independend of the regional settings
-- of the Windows server
locale: us-en - [bipath]\server\config\nqsconfig.ini
-- for displaying messages
-- this maps to "us-en" in localedefinitions.xml
LOCALE = "English-usa";
-- for input and output of dates
DATE_TIME_DISPLAY_FORMAT = "yyyy/mm/dd hh:mi:ss";
DATE_DISPLAY_FORMAT = "yyyy/mm/dd";
TIME_DISPLAY_FORMAT = "hh:mi:ss";
-- when on, obi does not guess what a string containing a date means
STRONG_DATETIME_TYPE_CHECKING = ON;
7*) Locale definitions in Answers webinterface
Set the locale, e.g. "English - United states" on the connection window or in your account settings: Settings -> Account
8*) Save display format
Set the locale, e.g. "English - United states" on the connection window or in your account settings: Settings -> Account
The default display format of a date is set in dbfeatures.ini (?)
It can be overriden for all date datatypes or specific attributes in Answers:
Criteria -> Column properties -> Save -> As the system-wide...
Example: database or session NLS parameter = 'YYYYMMDD'
CAST(DIM_DATE.TODAY AS CHAR)
CAST('20110211' AS DATE)
CAST('01-FEB-11' AS DATE) --> will fail if nls parameter is set to YYYYMMDD
Notes:
- Column properties -> date format (i.e.date or text) is set automatically after the result of a conversion. It does not steer, in any way, the input of functions.
No login prompt for Exchange
 It is possible to suppress the login prompt that appears in Outlook, when trying to connect to an Exchange server via Outlook Web Access.
This prompt can be skipped:
- Close Outlook
- Get the Exchange server name: Control Panel -> Mail (32 bit) -> Email accounts... -> View or change existing e-mail accounts -> Double click the "Exchange" account
- The microsoft exchange server name, e.g. exmbx01.acmexchange.com, becomes the exchange server name: *.acmexchange.com
- Get the webserver name: -> More settings -> Connection -> Exchange proxy settings
- The connection settings URL, e.g. webmail.acmeweb.com, becomes the webserver name: *.acmeweb.com
- Set proxy authentication settings: NTLM authentication
- Start the Credential Manager: Control Panel -> Credential Manager
- Add a windows credential, e.g. for jim@acme.com
a. internet or network address: *.acmeweb.com
b. username: jim@acme.com
c. password: pwd - Add another windows credential
a. internet or network address: *.acmexchange.com
b. username: jim@acme.com
c. password: pwd
Keywords: microsoft exchange, outlook 2003, outlook web access, repeating login prompt
SkyDrive photos in Flipboard
 Flipboard is a great app for the iPad. It displays a collections of RSS feeds as a magazine. The latest version (1.1.1) offers the ability to add a Google Reader account, which can contain a multitude of feeds. These feeds can even be categorized. Flipboard can easily display all feeds, the feeds in a category or individual feeds.
It has the ability to add a Flickr account to show the photos in that account. Unfortunately, Flickr is rather limited in its features: no more than 300MB per month upload.
There are alternatives for Flickr, like Google Picasa, Mediafire or Microsoft Live SkyDrive. Picasa has a storage limit of 1GB, which is even worse than Flickr. SkyDrive has a storage limit of 25GB, but no monthly upload quotum. The best thing about SkyDrive is that it has a RSS feed capability, so you can add it to your Google Reader account and have a magazine of photos. Mediafire has no upload or storage limitations, but no RSS feed capability, which is too bad, otherwise it would be the perfect photo-in-flipboard solution.
Because there is no dedicated Microsoft Live SkyDrive iPad app, this is a nice alternative.
Unfortunately, the RSS XML that SkyDrive returns is not interpreted by flipboard, like it is interpreted by, say, Google Reader, where the photos are displayed directly in the feed. Flipboard displays an empty article, with a link, that, when clicked, redirects to the photo. This is not useful. It turns out that the <link> element is the culprit.
Workaround
- Optionally, create a SkyDrive account. Create a Windows Live / SkyDrive account and create a new folder. Set it as a "photo" folder. Upload some photos to this account. Make a note of the "cid-" code in the URL (or on the SkyDrive webpage). It is the unique identifier for that account. Also make a note of the folder name.
- Create a conversion script that corrects the XML supplied by SkyDrive. Flipboard only displays the photos in the feed items, when the combination of the <link> tags of the <channel> and <item> tags form a valid URL. SkyDrive supplies the complete URL in the <link> tag of each item, so the <link> tag of the <channel> should be empty or not present at all.
- Host the script online. I have created a PHP script called default.php and am hosting it on freehostingnoads.net. An account can be freely created and their PHP configuration support the functionality needed to get HTML code from another website, in this case, SkyDrive. The complete URL to the website is:
http://www.livestreem.freehostingnoads.net/default.php
- Optionally, make the script dynamic. I added the posibility to supply a SkyDrive account id (CID) and folder to the script. Example for CID "cid-dba80f3be68c2301" and folder "genericweb" :
http://www.livestreem.freehostingnoads.net/default.php?cid=dba80f3be68c2301&folder=genericweb
- Add script URL to the Google Reader: add the URL of the conversion script to the Google Reader account. Use the complete URL, including the PHP script name.
So:
http://www.livestreem.freehostingnoads.net/default.php?cid=dba80f3be68c2301&folder=genericweb
and not:
http://www.livestreem.freehostingnoads.net/?cid=dba80f3be68c2301&folder=genericweb
- Optionally, test the feed. Google Reader updates the results from feeds at set intervals, that cannot be controlled. Pressing the "refresh" button is only useful after this interval has passed and Google has updated the feed internally. I use Chrome and, to test the feed realtime, I use the extention/add-on "Slick RSS"
- Add a Google Reader section to Flipboard: login with your username and password. This only needs to be done once. The domain name part of the link tag is used by Flipboard to prefix the text of an item with a bold text containing this text and a small icon. If there is no text, just a photo, it does not do this.
Some downsides:
- History explosion. Google stores the history of a feed. This can be annoying when testing a script with a lot of photos, because they get added again and again. Even worse, after deleting the subscription and adding it later, Google restores the full history! Google remembers the URL's and content of feeds that were added in the past.
- Low resolution. There is no easy way to get the full resolution photo from SkyDrive. It supplies a encoded path to a preview version - most of the time 600x400 pixels - and, when clicked from within the SkyDrive website, redirects to another encoded path for the full resolution.
- Photos are public. The photos need to be in a publicly available SkyDrive folder, unlike Flickr. With the Flickr photostream of Flipboard it is possible to login in with a username and password to a private folder.
SkyDrive ASPX pages
A list of .Net scripts to access SkyDrive:
- self.aspx: returns SkyDrive page for the specified document/photo
- embedphoto.aspx: returns a downsized version of the photo
- embedalbum.aspx
- feed.aspx: returns a XML document describing the RSS feed
- browse.aspx
Update 20110727:
Skydrive has been redesigned. The current feed works correctly with Flipboard, so the workaround above is no longer needed!
Combine two DVD's into one
 When you want to combine two DVD's onto one disc, but keep the chapters, then try the following steps. I assume the video_ts folders of both DVD's are already available on your harddrive.
In most cases there is no vob file per chapter, but each vob file is filled to its maximum (1GB) and then a new one is created. Sometimes, however, there is a vob file per chapter. In this case, you only need to follow the steps following DVDStyler:
- Download and install DVDShrink (freeware)
- Start DVDShrink and click "Reauthor"
- In the right pane under "dvd browser", navigate to the video_ts folder of the first DVD
- Drag the desired chapters to the left
- In the right pane under "dvd browser", navigate to the video_ts folder of the second DVD
- Drag the desired chapters to the left
- Under File, click "Backup" and save to folder c:\shrink. This set automagically creates a vob file per chapter!
- Download and install DVDStyler (freeware)
- Start DVDStyler and add all .vob files from c:\shrink to the current project. The DVD main- and chapter menu's are created automatically
- Optionally: add the names of the chapters to the chapter menus
- Burn the project to an iso file or directly to disc
Use 32-bits Excel Source with 64-bits SSIS
The following is still work in progress and more of a braindump than anything else, but I've put it here, because someone might already find some use for it
Straight out of the box, you cannot use the Excel Datasource in SSIS on a 64-bits Windows platform , because the Excel Datasource uses a 32-bits OLEDB library. Microsoft has not released a 64-bits version of this library.
0) Use MADE 2010
There is 64 bits version for Office 2010, so for Excel 2010. It is called "Microsoft Access Database Engine 2010 Redistributable" of which there is a 32- and 64-bits version. We're interested in the 64-bits version, but this package can only be installed after removing all 32 bits Office applications!
a) Install MADE 2010 while NOT removing 32 bits Office applications:
AccessDatabaseEngine_x64.exe /passive
Notes:
b) If that doesn't work, then also install the Data Connectivity Components:
http://www.microsoft.com/en-us/download/confirmation.aspx?id=23734
1) Trick Windows to use 32-bits ODBC data sources
Try adding the SysWow64 folder to the beginning of your path:
Path=%systemroot%\SysWow64;...old values here...
When done via the command prompt via the SET-command, it will be undone when that window is closed.
2) Run SSIS in 32-bits mode
Use the 32-bit DTEXEC.EXE to execute the package containing the Excel Datasource. It is located in "Program Files (x86)\Microsoft Sql Server\90\Dts\Binn" (or for SSIS 2008: "Program Files (x86)\Microsoft Sql Server\10\Dts\Binn")
You can schedule this using "task scheduler" or SQL Agent.
3) Compile package as 32-bits
Package configuration properties -> Debugging -> Debugging Options -> Run64BtRuntime -> set to False.
4) Even dirtier trick: convert Excel spreadsheet to CSV beforehand
This can be done in several ways, with minimal coding required:
Notes:
Straight out of the box, you cannot use the Excel Datasource in SSIS on a 64-bits Windows platform , because the Excel Datasource uses a 32-bits OLEDB library. Microsoft has not released a 64-bits version of this library.
0) Use MADE 2010
There is 64 bits version for Office 2010, so for Excel 2010. It is called "Microsoft Access Database Engine 2010 Redistributable" of which there is a 32- and 64-bits version. We're interested in the 64-bits version, but this package can only be installed after removing all 32 bits Office applications!
a) Install MADE 2010 while NOT removing 32 bits Office applications:
AccessDatabaseEngine_x64.exe /passive
Notes:
- THE SYSTEM WILL AUTOMATICALLY REBOOT, SO SAVE WORK BEFOREHAND!
- Start Excel once to go through the configuration process. Start it a second time. It the configuration process starts again, then disable it by renaming this file to "setup_disabled.exe":
c:\Program Files (x86)\Common Files\microsoft shared\OFFICE14\Office Setup Controller\setup.exe - run the repair option for the Microsoft Access database engine 2010 program inside "add/remove programs"
b) If that doesn't work, then also install the Data Connectivity Components:
http://www.microsoft.com/en-us/download/confirmation.aspx?id=23734
1) Trick Windows to use 32-bits ODBC data sources
Try adding the SysWow64 folder to the beginning of your path:
Path=%systemroot%\SysWow64;...old values here...
When done via the command prompt via the SET-command, it will be undone when that window is closed.
2) Run SSIS in 32-bits mode
Use the 32-bit DTEXEC.EXE to execute the package containing the Excel Datasource. It is located in "Program Files (x86)\Microsoft Sql Server\90\Dts\Binn" (or for SSIS 2008: "Program Files (x86)\Microsoft Sql Server\10\Dts\Binn")
You can schedule this using "task scheduler" or SQL Agent.
3) Compile package as 32-bits
Package configuration properties -> Debugging -> Debugging Options -> Run64BtRuntime -> set to False.
4) Even dirtier trick: convert Excel spreadsheet to CSV beforehand
This can be done in several ways, with minimal coding required:
- If Excel is installed, then create a VBS script that uses CreateObject("Excel.Application") to create an Excel object. Then open the XLS file and save it as a CSV using this object.
- ... or a perl script using the "Spreadsheet::ParseExcel" module
- ... or a powershell script using "comobject Excel.Application"
- Install OpenOffice and program a small macro in it's OpenOffice basic language. Then create a VBS or DOS script that opens OpenOffice and calls the macro with parameters, one being the source XLS, and one being the target CSV.
- Without installing anything on the server running SSIS: write a small C# application that utilizes the Excel OLEDB data provider built into Windows to read data from the Excel sheet. Then write the results to a CSV file.
- ... or write a small C# application that utilizes the opensource Excel Data Reader library to read data from the Excel sheet. Then write the results to a CSV file. This library appears to be buggy however.
- Freeware commandline tool: XLS2CSV by Zoom Technology. Parses only the first sheet. The column separator and text quotes are configurable throught an ini file
- Freeware commandline tool: XLS2CSV by Tom Crow. Parses all sheets to separate CSV files
ODBC/DSN configuration can be found here:
- 32 bits ODBC connections: %windir%\syswow64\odbcad32.exe
- 64 bits ODBC connections: %windir%\system32\odbcad32.exe
- ADO also uses the OLEDB library.
- The OLEDB library is a piece of code that gets loaded and compiled into the calling application at runtime.
- If you use the MADE 2010 Redistributable package, then be aware of a small bug when connecting to Office 2010. You have to use "MICROSOFT.ACE.OLEDB.12.0" as the driver name in stead of the specified "MICROSOFT.ACE.OLEDB.14.0".
- Although previous Office versions need to be de-installed before installing MADE 2010, they can be reinstalled afterwards.
Increase maximum volume of the iPad
If you find that the maximum volume on the iPad is not loud enough, then you can fix that with the following adjustment:
Note:
- Start Cydia
- If you haven't installed OpenSSH, then search for it and install the app, restart the iPad
- Install WinSCP on your Windows environment and make a connection to the iPad. The iPad IP adress can be found on the iPad in Settings -> Wi-Fi. Click on the blue arrow on your current wifi connection. By default the username is "root" and the password "alpine".
- Download and install iPodRobot for Windows
- Open a connection to the iPad via WinSCP
- Copy the following file to your Windows environment: System/Library/PrivateFrameworks/Celestial.framework/RegionalVolumeLimits.plist
- Just in case anything goes wrong: make a copy of this file on your Windows environment
- Start iPodRobot and load RegionalVolumeLimits.plist
- Find and replace 0.xx000000000000004 with 1, where x=79 or 84, or some other number under 100
- Save the file and copy it back to the iPad using WinSCP
- Reboot the iPad.
The volume will be much louder, so tune it down before starting any music or video on the iPad.
- The iPad needs to be jailbroken, i.e. needs to have Cydia installed
- The Cydia/Winterboard apps Volume Boost X3 and Volume Boost 4.0 have no effect on the iPad.
Alternatively, using iTunes, you can boost the volume of each individual video/song:
- Start iTunes
- Select all songs under iPad -> Music
- Right click and select "Get info"
- Tab "options", drag the slider to +100%
The song volumes will be adjusted song by song. This can take a long time!
Keywords: setting the maximum volume limit on iPod
Keywords: setting the maximum volume limit on iPod
Subscribe to:
Posts (Atom)